
프로젝트를 진행하는데, 이미지 저장을 해야 해서 찾아보았다.
스프링 공식 가이드
Getting Started | Uploading Files
To start a Spring Boot MVC application, you first need a starter. In this sample, spring-boot-starter-thymeleaf and spring-boot-starter-web are already added as dependencies. To upload files with Servlet containers, you need to register a MultipartConfigEl
spring.io
스프링 공식 가이드 깃허브 소스코드
GitHub - spring-guides/gs-uploading-files: Uploading Files :: Learn how to build a Spring application that accepts multi-part fi
Uploading Files :: Learn how to build a Spring application that accepts multi-part file uploads. - GitHub - spring-guides/gs-uploading-files: Uploading Files :: Learn how to build a Spring applicat...
github.com
스프링 공식문서에서 설명하는 방식대로 따라가보자
(파일 저장하는 부분만 필요하기 때문에 해당 부분만 간략하게 살펴봅니다)
java 17
Spring-boot 3.0.0
대충 쭈욱 훑어보면
Post요청으로 파일을 보내면 Controller에서 MultipartFile로 받아서 StorageService에 store() 메서드를 이용하여 저장하라고 한다
Controller

MultipartFile 의 형태로 받아서 storageService.store() 를 이용하여 파일을 저장한 뒤, 성공적으로 저장됐다는 메시지와 함께 리다이렉트 시키고 있다.
나는 리다이렉트 관련 메시지는 필요 없으니 그냥 간략하게 저장만 하고 201 메시지를 주도록 했다.
@PostMapping("/images")
public ResponseEntity postImages(@RequestParam MultipartFile file) {
    storageService.store(file);
    return ResponseEntity.status(HttpStatus.CREATED).build();
}
Service
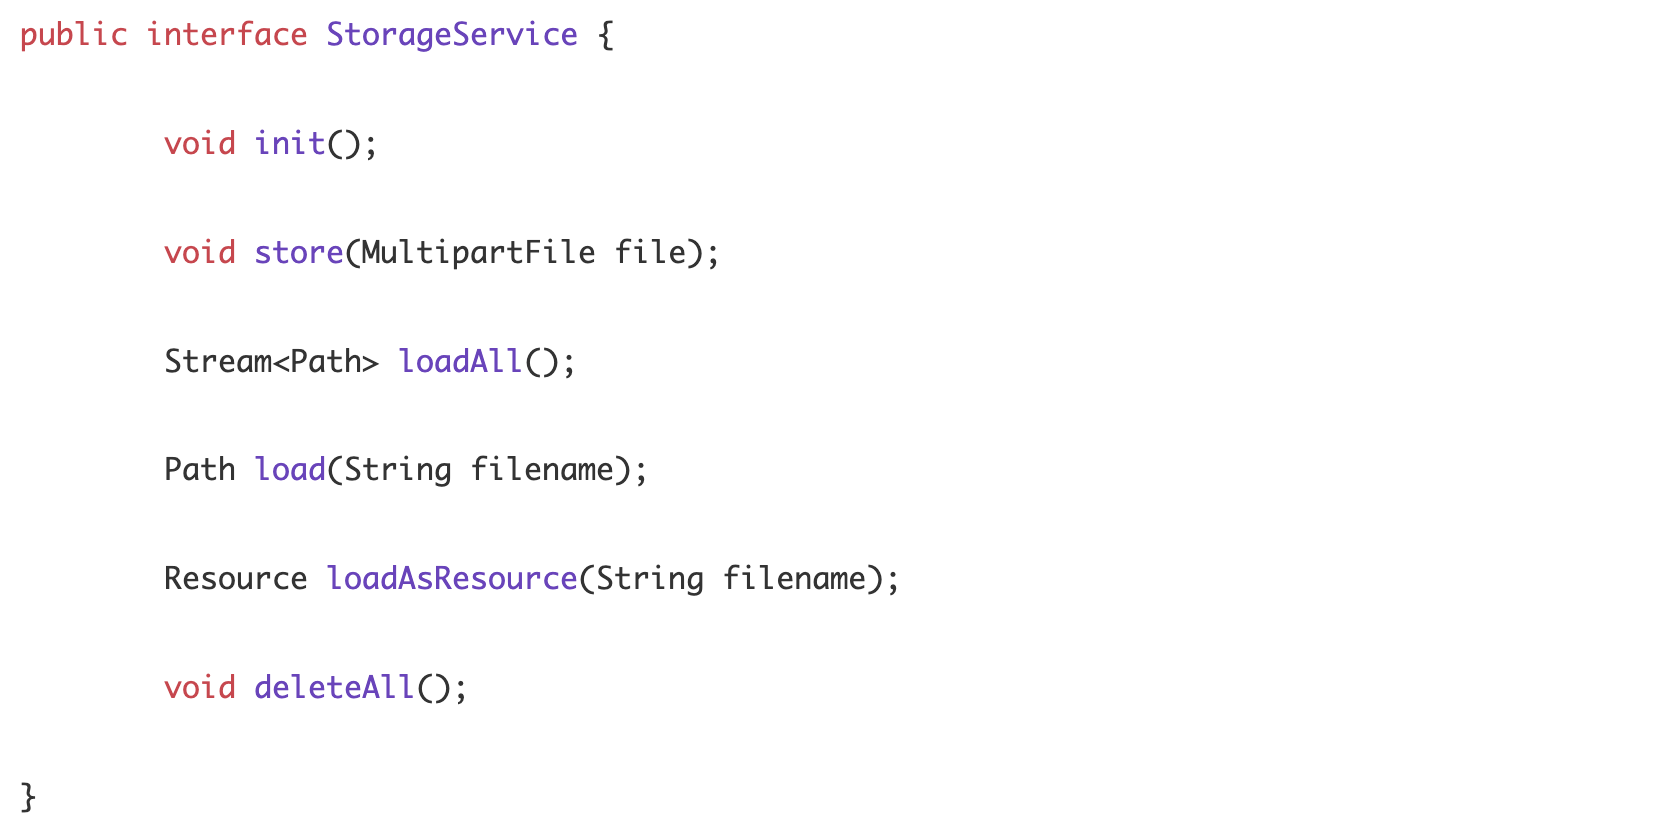
공식 문서에는 Service 인터페이스를 만들어서 해당 인터페이스를 입맛에 맞게 적절히 구현하도록 유도하고 있다.
나는 이 중 저장만 할 것이기 때문에 store() 메서드만 볼 것이다.
스프링 공식 문서에 보면 예시 소스코드가 있다.

MultipartFile을 받아서 파일이 비어있으면 예외를 던지고
copy() 메서드를 이용해 인풋스트림을 rootLocation에 복사하고, 입력받은 파일명 그대로 저장을 하고
IOException 발생 시 예외를 던지도록 되어있다.
거의 흡사하게 따라 해보았다. (예외 부분은 패스 ㅎ)
그리고 추가적으로 REPLACE_EXISTING 옵션을 추가하여, 동일한 파일명이 있을 경우 덮어쓰기를 진행하도록 했다.
해당 옵션이 없을 경우 동일한 이름의 파일명이 존재할 경우 'FileAlreadyExistsException' 예외가 발생한다.
// 파일이 저장될 경로 : /현재프로젝트경로/src/main/resources/static/
private final Path fileDir = Path.of(System.getProperty("user.dir"), "src/main/resources/static");
// 파일 저장 메서드
public void store(MultipartFile file) {
try {
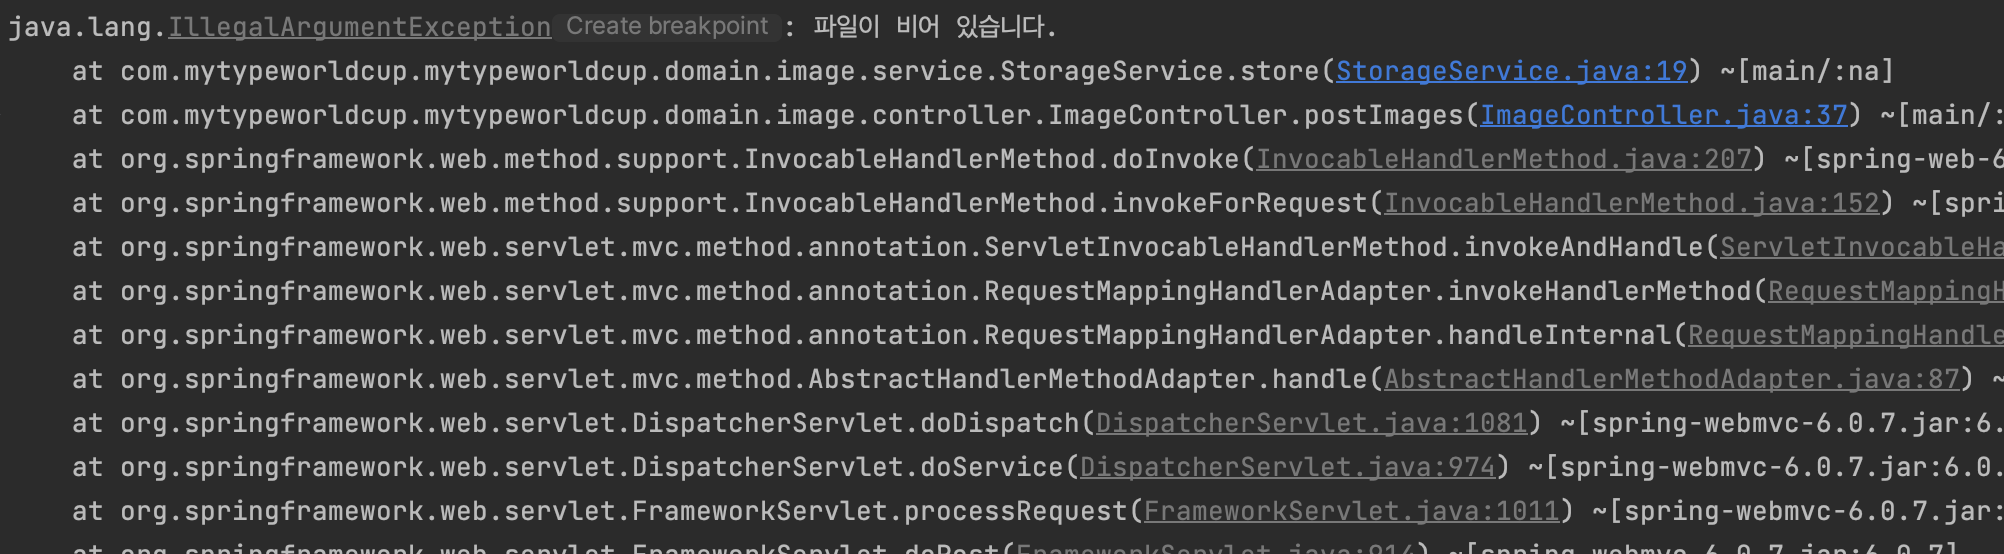
if (file.isEmpty()) {
throw new IllegalArgumentException("파일이 비어 있습니다.");
}
Files.copy(file.getInputStream(), this.fileDir.resolve(file.getOriginalFilename()), StandardCopyOption.REPLACE_EXISTING);
} catch (IOException e) {
throw new RuntimeException("파일 저장 실패 : " + file.getOriginalFilename(), e);
}
}
서버에서 관리할 파일은 this.fileDir.resolve(file.getOriginalFilename()) 부분을 적절히 수정하여 경로와 파일명을 설정해 주면 된다.
file.getOriginalFilename() 은 메서드명에서 알 수 있듯이 업로드한 파일의 이름을 가져오는 메서드이다.
해당 부분을 적절히 수정하면 원하는 파일명으로 저장할 수 있다.
사용해보기
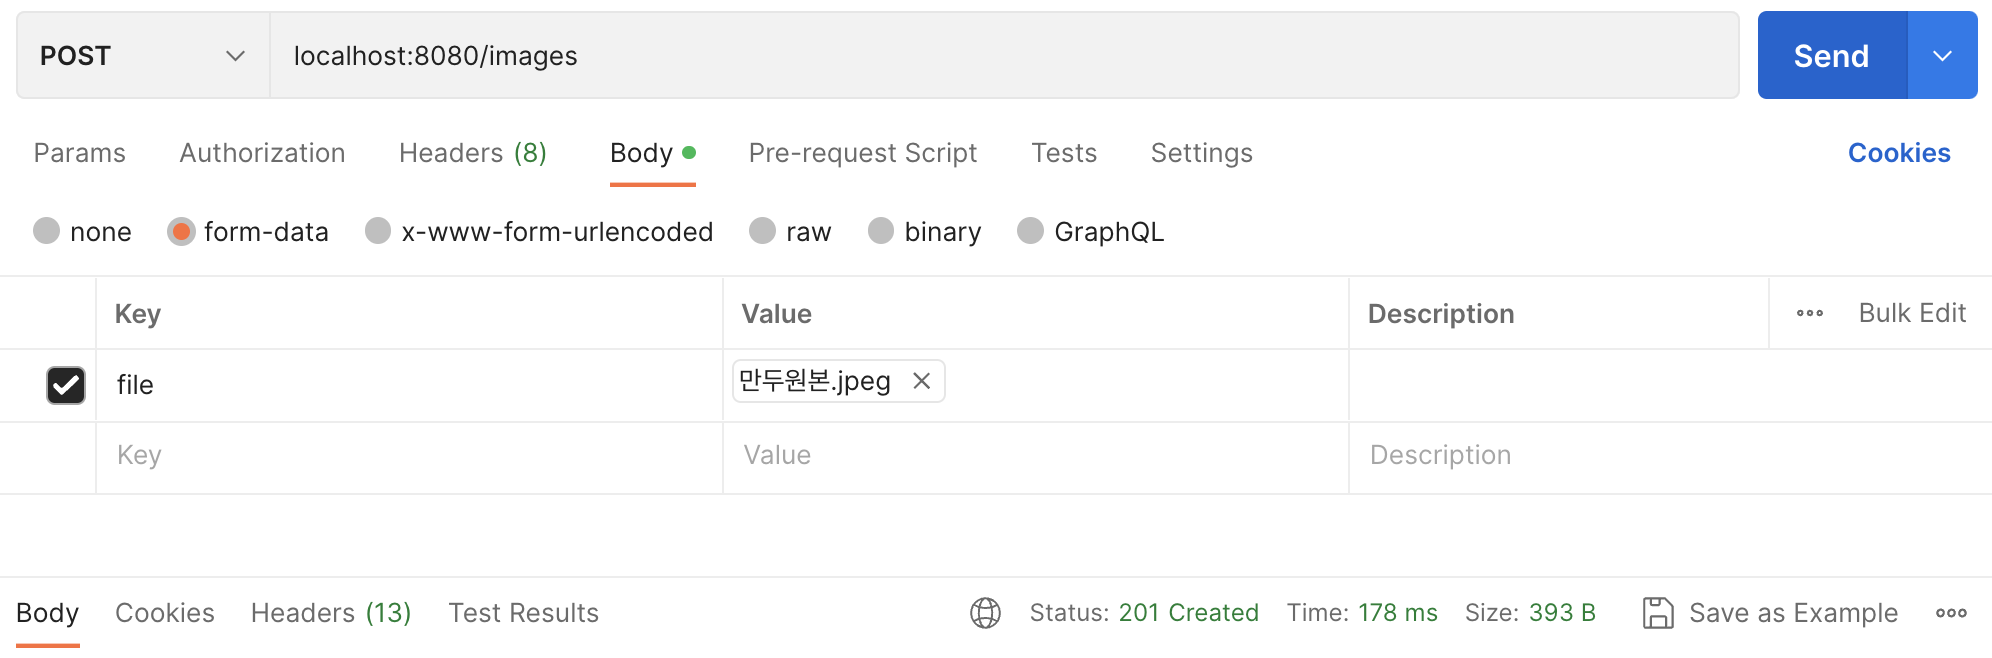
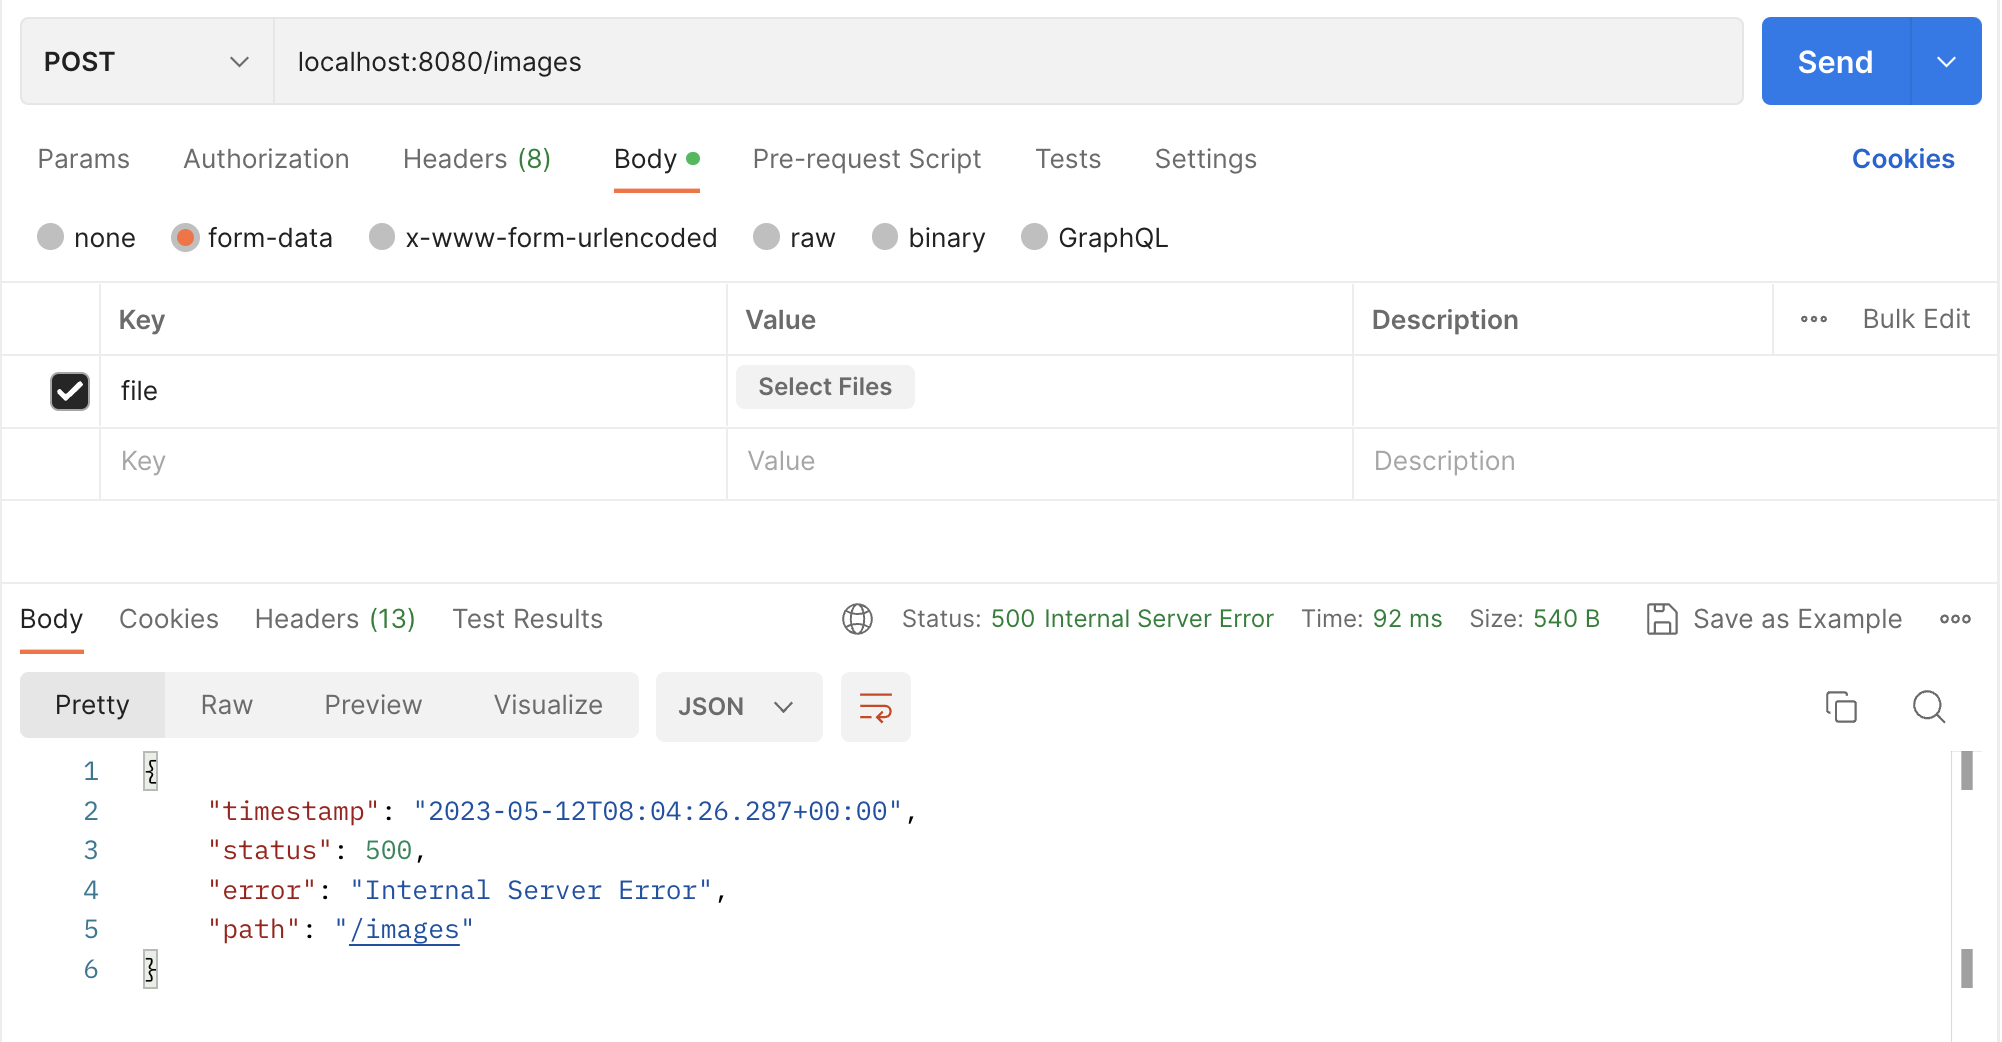
포스트맨을 이용하여 이미지를 업로드한다.
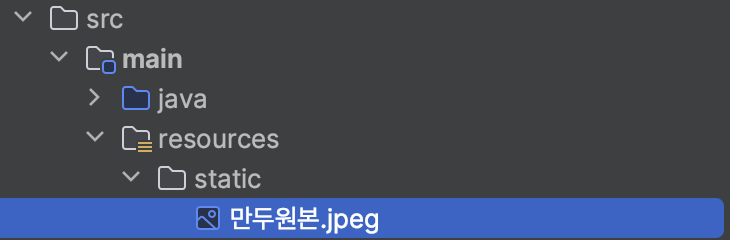
내가 설정한 경로에 원본 파일명 그대로 정상적으로 저장된 모습
만약 빈 파일을 보내게 되면 입력했던 데로 예외가 발생한다.
결론
- 파일 저장 방식은 해당 방법 말고도 여러가지가 있다
- 유효성 검사 관련 로직을 적절히 추가하여 원하는 파일만 받도록 수정할 수 있다
- 파일명을 설정해주는 로직을 추가하여 중복되지 않도록 할 수 있다 (ex. uuid)
- 근데 난 이미지 서버 사용할거라 ..ㅎ
'개발일지 > 돌픽' 카테고리의 다른 글
| spring-boot Cache-Control 설정으로 부하 줄이기 (0) | 2023.05.19 |
|---|---|
| ImgBB API 이용해보기 (0) | 2023.05.17 |
| 네이버 무료 검색 API 이용해보기 (0) | 2023.05.01 |
| Google Custom Search API 사용해보기 (0) | 2023.04.30 |
| 테스트 시 SpringSecurity 비활성화 하기 (0) | 2023.04.28 |
프로젝트를 진행하는데, 이미지 저장을 해야 해서 찾아보았다.
스프링 공식 가이드
Getting Started | Uploading Files
To start a Spring Boot MVC application, you first need a starter. In this sample, spring-boot-starter-thymeleaf and spring-boot-starter-web are already added as dependencies. To upload files with Servlet containers, you need to register a MultipartConfigEl
spring.io
스프링 공식 가이드 깃허브 소스코드
GitHub - spring-guides/gs-uploading-files: Uploading Files :: Learn how to build a Spring application that accepts multi-part fi
Uploading Files :: Learn how to build a Spring application that accepts multi-part file uploads. - GitHub - spring-guides/gs-uploading-files: Uploading Files :: Learn how to build a Spring applicat...
github.com
스프링 공식문서에서 설명하는 방식대로 따라가보자
(파일 저장하는 부분만 필요하기 때문에 해당 부분만 간략하게 살펴봅니다)
java 17
Spring-boot 3.0.0
대충 쭈욱 훑어보면
Post요청으로 파일을 보내면 Controller에서 MultipartFile로 받아서 StorageService에 store() 메서드를 이용하여 저장하라고 한다
Controller
MultipartFile 의 형태로 받아서 storageService.store() 를 이용하여 파일을 저장한 뒤, 성공적으로 저장됐다는 메시지와 함께 리다이렉트 시키고 있다.
나는 리다이렉트 관련 메시지는 필요 없으니 그냥 간략하게 저장만 하고 201 메시지를 주도록 했다.
@PostMapping("/images")
public ResponseEntity postImages(@RequestParam MultipartFile file) {
    storageService.store(file);
    return ResponseEntity.status(HttpStatus.CREATED).build();
}
Service
공식 문서에는 Service 인터페이스를 만들어서 해당 인터페이스를 입맛에 맞게 적절히 구현하도록 유도하고 있다.
나는 이 중 저장만 할 것이기 때문에 store() 메서드만 볼 것이다.
스프링 공식 문서에 보면 예시 소스코드가 있다.
MultipartFile을 받아서 파일이 비어있으면 예외를 던지고
copy() 메서드를 이용해 인풋스트림을 rootLocation에 복사하고, 입력받은 파일명 그대로 저장을 하고
IOException 발생 시 예외를 던지도록 되어있다.
거의 흡사하게 따라 해보았다. (예외 부분은 패스 ㅎ)
그리고 추가적으로 REPLACE_EXISTING 옵션을 추가하여, 동일한 파일명이 있을 경우 덮어쓰기를 진행하도록 했다.
해당 옵션이 없을 경우 동일한 이름의 파일명이 존재할 경우 'FileAlreadyExistsException' 예외가 발생한다.
// 파일이 저장될 경로 : /현재프로젝트경로/src/main/resources/static/
private final Path fileDir = Path.of(System.getProperty("user.dir"), "src/main/resources/static");

// 파일 저장 메서드
public void store(MultipartFile file) {
    try {
        if (file.isEmpty()) {
            throw new IllegalArgumentException("파일이 비어 있습니다.");
        }
        Files.copy(file.getInputStream(), this.fileDir.resolve(file.getOriginalFilename()), StandardCopyOption.REPLACE_EXISTING);
    } catch (IOException e) {
        throw new RuntimeException("파일 저장 실패 : " + file.getOriginalFilename(), e);
    }

}
서버에서 관리할 파일은 this.fileDir.resolve(file.getOriginalFilename()) 부분을 적절히 수정하여 경로와 파일명을 설정해 주면 된다.
file.getOriginalFilename() 은 메서드명에서 알 수 있듯이 업로드한 파일의 이름을 가져오는 메서드이다.
해당 부분을 적절히 수정하면 원하는 파일명으로 저장할 수 있다.
사용해보기
포스트맨을 이용하여 이미지를 업로드한다.
내가 설정한 경로에 원본 파일명 그대로 정상적으로 저장된 모습
만약 빈 파일을 보내게 되면 입력했던 데로 예외가 발생한다.
결론
- 파일 저장 방식은 해당 방법 말고도 여러가지가 있다
- 유효성 검사 관련 로직을 적절히 추가하여 원하는 파일만 받도록 수정할 수 있다
- 파일명을 설정해주는 로직을 추가하여 중복되지 않도록 할 수 있다 (ex. uuid)
- 근데 난 이미지 서버 사용할거라 ..ㅎ
'개발일지 > 돌픽' 카테고리의 다른 글
| spring-boot Cache-Control 설정으로 부하 줄이기 (0) | 2023.05.19 |
|---|---|
| ImgBB API 이용해보기 (0) | 2023.05.17 |
| 네이버 무료 검색 API 이용해보기 (0) | 2023.05.01 |
| Google Custom Search API 사용해보기 (0) | 2023.04.30 |
| 테스트 시 SpringSecurity 비활성화 하기 (0) | 2023.04.28 |